Automatically transcribe audio from Google Drive into an SRT file
Automatically transcribe audio and video files uploaded to a Google Drive folder and save the resulting SRT subtitle file back to Google Drive.
Requirements
- A Google account with access to Google Drive
- A Zapier account
- A Speech is Cheap API key (How to Transcribe explains how to obtain one)
- A Google Drive folder for audio and video files
Implementation
Configure the Google Drive trigger
- Go to Zapier home.
- Click on "Zap" under "Start from Scratch".
- Click on Trigger and select the Google Drive app.
- Set up the trigger:
- Trigger event: New File in Folder
- Account: Your Google Drive account
- Click on "Continue".
- Configure the trigger:
- Drive: Your Google Drive
- Folder: The folder where you upload audio or video files
- Include Subfolders?: False
- Include Deleted Files?: Only return non-deleted files
- Click on "Continue".
- Test the trigger:
- Click on "Test trigger".
- Select a sample record and click on "Continue with selected record". This step requires at least one file in the watched folder.
Filter media files
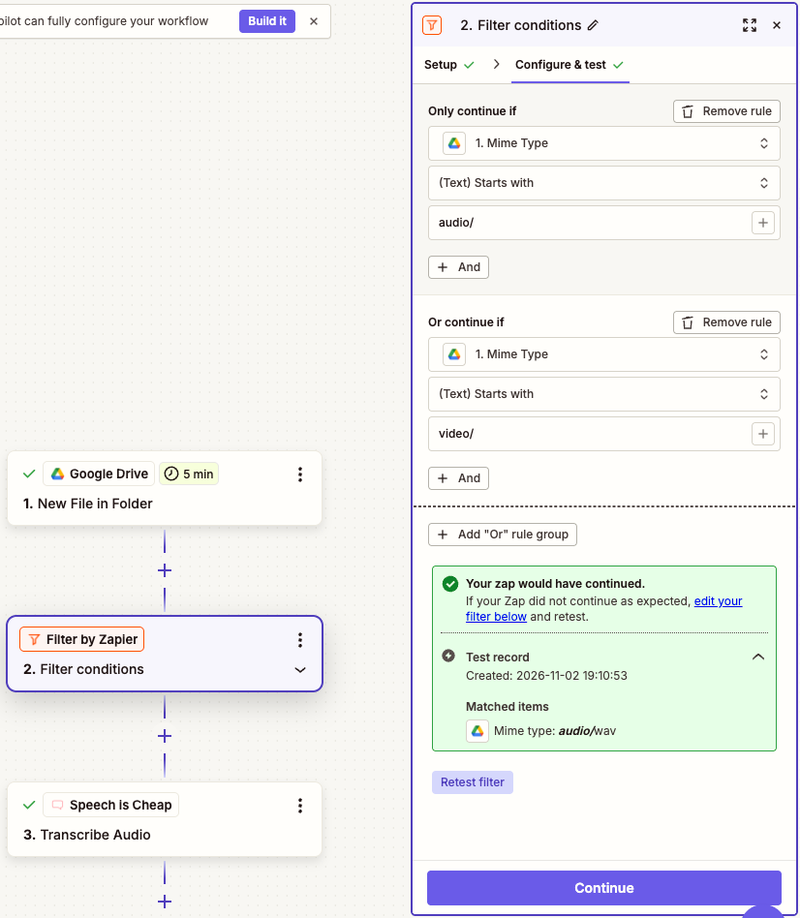
This workflow saves subtitles beside the recording. A filter step checks the MIME type before transcription so generated .srt files and other non-media files do not reach Speech is Cheap, preventing an extra failed run.
- Add a step by clicking on the plus below the Google Drive trigger.
- Select the Filter by Zapier app. Zapier automatically selects Filter conditions.
- Click on "Continue" to open Configure & test.
- Configure the filter conditions under Only continue if...:
- Field: Select
Mime Typefrom the Google Drive step. - Condition:
(Text) Starts with - Value:
audio/ - Add an Or rule group.
- Field: Select
Mime Typefrom the Google Drive step. - Condition:
(Text) Starts with - Value:
video/
- Field: Select
- Click on "Continue". Zapier confirms whether the sample record passes the filter.
Transcribe audio with Speech is Cheap
- Add a step by clicking on the plus below the filter step.
- Select the Speech is Cheap app, or search for it in the Zapier App Directory.
- Set up the action:
- Action event: Transcribe Audio
- Account: Select an existing Speech is Cheap account, or connect a new account by entering your API key in the API Token field.
- Click on "Continue".
- Configure the action:
- Input File: Select File from the Google Drive step.
- Leave Input URL blank.
- Speaker parsing, word parsing, and audio labeling default to
False. - Optional: Set Can Parse Speakers? to
Trueif you want speaker labels such asSpeaker A:in the subtitle text. Speaker parsing is an optional paid add-on; see the pricing page for rates. - Fill out any other optional fields, such as Language.
- Click on "Continue".
- Test the action:
- Click on "Test step".
- The editor test returns sample transcription data. Refer to the Overview for how editor test samples differ from billed published runs, as well as shared input options and halting behavior.
- The Transcribe Audio action waits for transcription to complete before continuing, so a separate lookup step is not needed.
Upload SRT file to Google Drive
- Add a step by clicking on the plus below the "Transcribe Audio" action.
- Select the Google Drive app.
- Set up the action:
- Action event: Upload File
- Account: Your Google Drive account
- Click on "Continue".
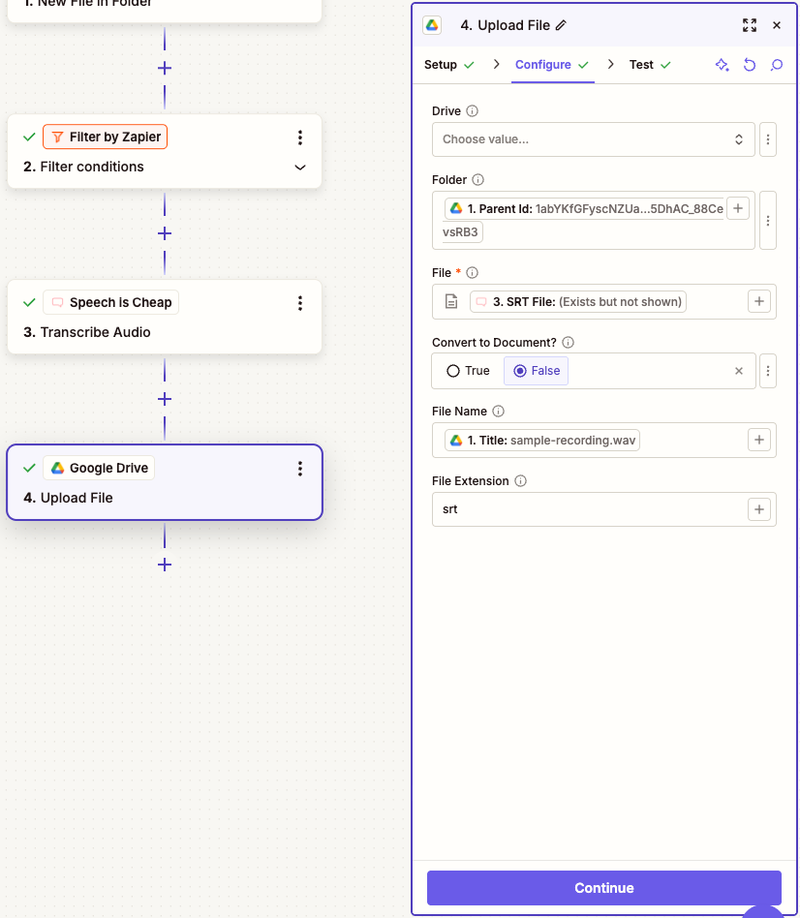
- Configure the action:
- Drive: Select your Google Drive.
- Folder: Open the field menu, choose Custom, and select Parent Id from the Google Drive trigger step. This saves the subtitle file beside the recording.
- File: Select
SRT Filefrom the Speech is Cheap step. UseSRT File, which is the downloadable file object, rather thanSRT Subtitles, which is raw text. - Convert to Document?:
False - File Name: Select
Titlefrom the Google Drive trigger step. - File Extension:
srt - Click on "Continue".
- Test and publish:
- Click on "Test step".
- Verify that Google Drive uploads a real sample
.srtfile beside the trigger file using the sample subtitle data. - Click on "Publish".
Verify the implementation
- Upload a fresh supported audio or video file to the watched Google Drive folder.
- Wait for the published Zap to run. The filter confirms the MIME type starts with
audio/orvideo/, Speech is Cheap transcribes the recording, and Google Drive uploads the.srtsubtitle file. - Check the Google Drive folder to confirm the new
.srtfile appears next to the original media file. For example,recording.wavproducesrecording.wav.srt. - When Google Drive triggers on the newly uploaded
.srtfile, the filter step halts execution because the MIME type is not audio or video, preventing an extra failed transcription run.
Notes
Files passed through Input File must satisfy the constraints in Input Requirements and Supported File Types. The Overview explains when to use Input URL.