Automatically transcribe audio from Google Drive into an AI summary
Automatically transcribe audio and video files uploaded to a Google Drive folder and generate a bulleted summary using AI by Zapier.
Requirements
- A Google account with access to Google Drive
- A Zapier account
- A Speech is Cheap API key (How to Transcribe explains how to obtain one)
- A Google Drive folder for incoming audio and video files
Implementation
Configure the Google Drive trigger
- Go to Zapier home.
- Click on "Zap" under "Start from Scratch".
- Click on Trigger and select the Google Drive app.
- Set up the trigger:
- Trigger event: New File in Folder
- Account: Your Google Drive account
- Click on "Continue".
- Configure the trigger:
- Drive: Your Google Drive
- Folder: The folder where you upload audio or video files
- Include Subfolders?: False
- Include Deleted Files?: Only return non-deleted files
- Click on "Continue".
- Test the trigger:
- Click on "Test trigger".
- Select a sample record and click on "Continue with selected record". This step requires at least one file in the watched folder.
Transcribe audio with Speech is Cheap
- Add a step by clicking on the plus below the Google Drive trigger.
- Select the Speech is Cheap app, or search for it in the Zapier App Directory.
- Set up the action:
- Action event: Transcribe Audio
- Account: Select an existing Speech is Cheap account, or connect a new account by entering your API key in the API Token field.
- Click on "Continue".
- Configure the action:
- Input File: Select File from the Google Drive step.
- Leave Input URL blank.
- Speaker parsing, word parsing, and audio labeling default to
False. - Optional: Set Include Timestamps in Transcript? to
Trueif you want timestamps in the transcript text. - Optional: Set Can Parse Speakers? to
Trueto include speaker labels such asSpeaker A:. Speaker parsing is an optional paid add-on; see the pricing page for rates. - Fill out any other optional fields, such as Language.
- Click on "Continue".
- Test the action:
- Click on "Test step".
- The editor test returns sample transcription data. Refer to the Overview for how editor test samples differ from billed published runs, as well as shared input options and halting behavior.
- The Transcribe Audio action waits for transcription to complete before continuing, so a separate lookup step is not needed.
Summarize the transcript with AI by Zapier
- Add a step by clicking on the plus below the "Transcribe Audio" action.
- Select the AI by Zapier app, or search for it in the Zapier App Directory.
- Selecting AI by Zapier opens the prompt editor directly.
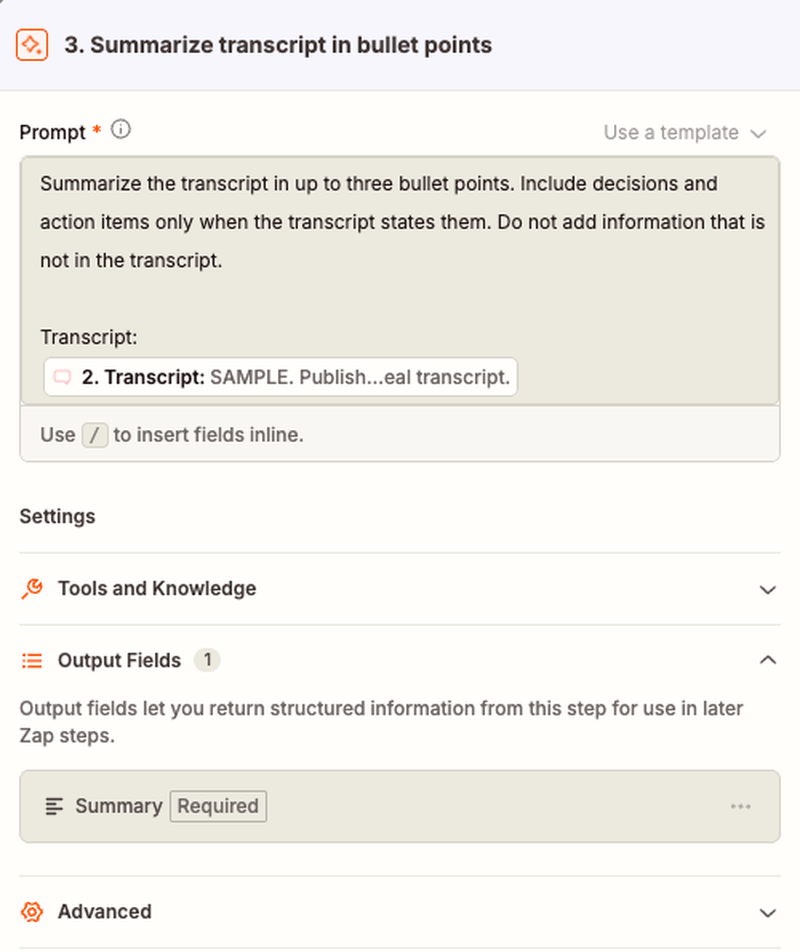
- Configure the prompt in the Prompt field:
-
Enter the following prompt text:
Summarize the transcript in up to three bullet points. Include decisions and action items only when the transcript states them. Do not add information that is not in the transcript.
Transcript:
-
After
Transcript:, type/to open the Zapier data picker. -
Search for
Transcriptand select Transcript from the Speech is Cheap step. Do not select Output Segments Text. -
Zapier automatically sets the step name from your prompt.
-
- Configure model settings in the Change AI model menu:
- Select Standard with model selection set to Auto.
- Leave Bring Your Own Key set to
Off. Built-in models run without an external API key. - Leave Tools empty.
- Configure Output Fields:
- AI by Zapier auto-generates an output field. If a field exists, select More options > Edit; if no field exists, click on Add field.
- Set Field name to
Summary. - Set Field type to
Text. - Set Required to
True. - Click on "Save".
- Test and finish:
- Click on "Preview" to run the prompt against the upstream sample. Because the Speech is Cheap editor test returns sample placeholder text, this preview confirms field structure and prompt syntax rather than a summary of your actual audio recording.
- Close the prompt editor using the Close step details button.
- Click on "Publish".
Verify the implementation
- Upload a fresh supported audio or video file to the watched Google Drive folder.
- Wait for the published Zap to run. Google Drive detects the file, Speech is Cheap transcribes the recording, and AI by Zapier generates the summary.
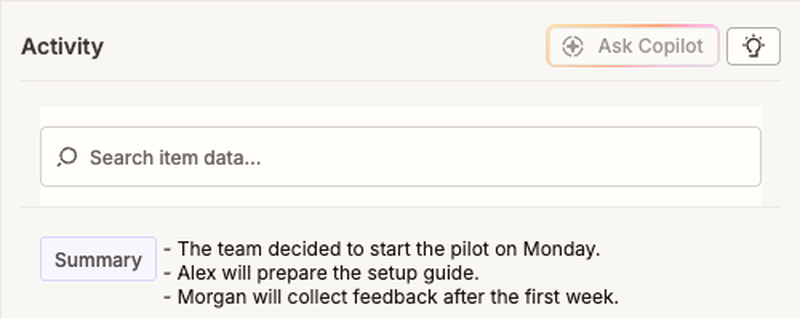
- Open Zap History in Zapier to view the run data. Expand the AI by Zapier step to review the generated text under the
Summaryoutput field. - The generated
Summaryfield is available in Zap history and as mapping data for any downstream destination step you choose to add later.
Other LLM apps
You can also pass transcripts to other third-party LLM integrations in Zapier. Speech is Cheap does not endorse or maintain these integrations. Each third-party provider requires its own account and API key, and calls may incur separate usage billing from that provider.
The actions listed below are verified from official Zapier app documentation rather than live tests in this guide:
| App | Action event | Setup details | Required credentials |
|---|---|---|---|
| ChatGPT (OpenAI) | Conversation | Put transcript in User Message and summarization directions in Instructions. | OpenAI API key |
| Anthropic (Claude) | Send Message | Put transcript and directions in User Message, or place directions in System. | Anthropic API key |
| Google AI Studio (Gemini) | Send Prompt | Place transcript and directions in Prompt, or place directions in System Instructions. | Google AI Studio API key |
Notes
Files passed through Input File must satisfy the constraints in Input Requirements and Supported File Types. The Overview explains when to use Input URL.
For details on prompt syntax and output field configuration, refer to Zapier's Analyze and Return Data guide. Very long transcripts may exceed the context window of the selected AI model. Review Zapier's prompting guidance for details on context limits.